
How to Use NX40 with the Arduino Platform
The procedure targets the DEV-NX40 development board. A bare NX40 module requires a carrier board, a valid power design, USB or SWD access, and the KORLINX UF2/DFU bootloader before the Arduino upload workflow can be used.
BSP source baseline This page uses the identifiers published by the KORLINX BSP:
- Board package: KXBoards nRF52
- Board: NX40 nRF52840
- FQBN:
korlinx:nrf52:nx40 - BSP release used as the documentation baseline:
1.0.1
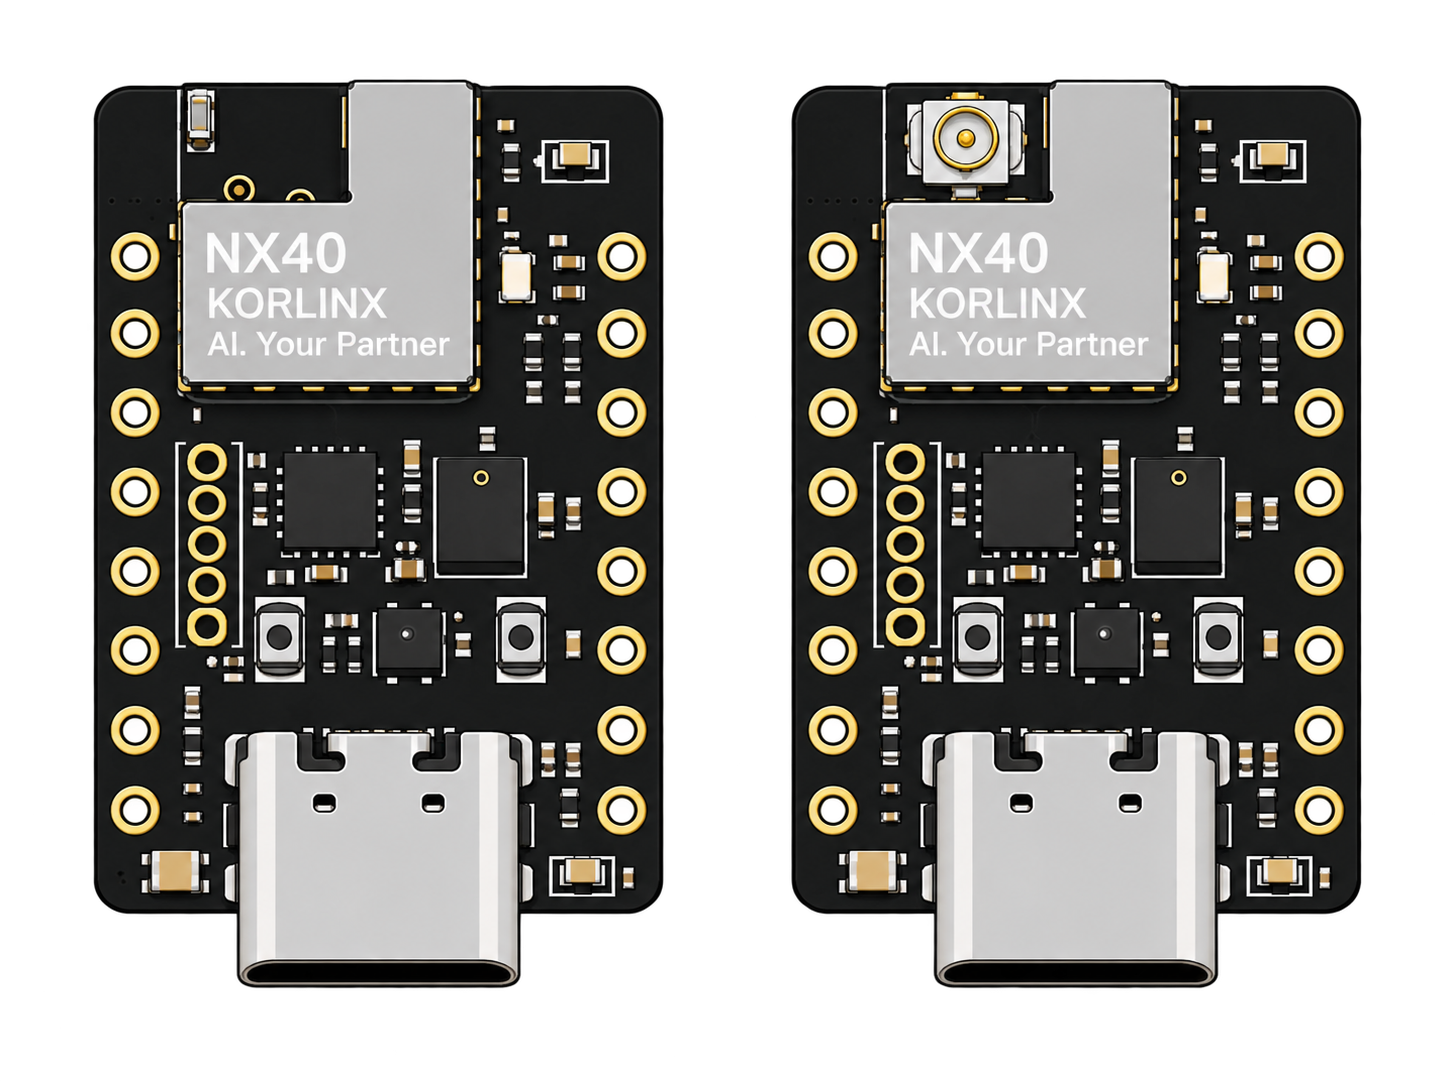
NX40 Dev-Kit variants used with the KORLINX Arduino BSP.
What you will build
Install the KORLINX BSP, select NX40, and upload a sketch that blinks the onboard red user LED every 500 ms. An optional second sketch verifies USB Serial output.
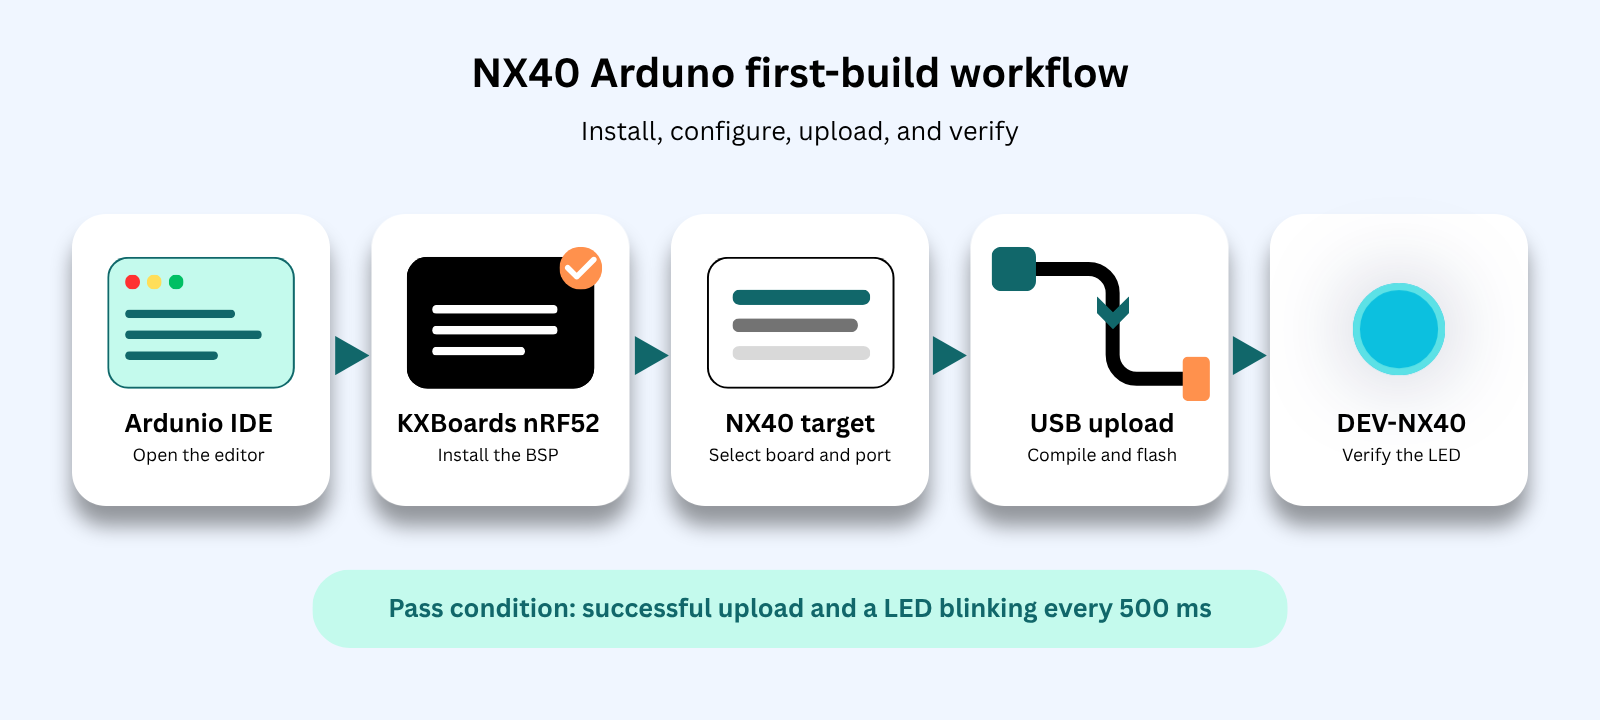
Install the BSP, select NX40, upload the sketch, and verify the onboard LED.
Supported host platforms
The BSP repository provides host-tool definitions for Windows, macOS, and Linux. A tested OS and Arduino IDE compatibility matrix is not yet provided in this guide.
| Host platform | Available tooling |
|---|---|
| Windows | A Windows adafruit-nrfutil uploader is bundled |
| macOS | A macOS adafruit-nrfutil uploader is bundled |
| Linux | Compiler packages are declared for common architectures; install adafruit-nrfutil separately as described in Step 3 |
Before you begin
Required hardware
| Item | Requirement |
|---|---|
| Development board | One DEV-NX40 with the KORLINX UF2/DFU bootloader installed |
| USB cable | Data-capable cable that matches the DEV-NX40 USB connector |
| Host computer | Windows, macOS, or Linux system with internet access |
| Optional debug probe | Required only to install or recover the bootloader over SWD |
Use a data-capable USB cable Some USB cables provide power only. If the board powers up but no serial port appears, test with a known data cable and a direct USB port on the computer.
Required software
- Arduino IDE, preferably the current Arduino IDE 2 release
- KORLINX nRF52 Arduino BSP
- On Linux,
adafruit-nrfutilavailable inPATH
Before connecting external hardware
The Arduino names in the BSP are software mappings. Confirm the physical DEV-NX40 header pinout and voltage limits in the released KORLINX hardware guide before connecting sensors or other circuits.
Step 0: Install or recover the bootloader (if needed)
Use the KORLINX nRF52 Arduino BSP repository for the bootloader files and installation instructions.
Skip SWD programming if the KORLINX NX40 bootloader is already installed and working. A blank board, or a board whose bootloader was overwritten, needs this preparation before Arduino USB upload.
Check for an existing bootloader
- Connect the board's native USB interface with a data-capable cable.
- Press Reset twice within 500 ms, or hold SW2 while pressing Reset.
- Check for the NX40BOOT USB drive and the bootloader serial port.
These entry methods are documented in the KORLINX bootloader README. If the drive and port appear, continue to Step 1. If they do not, check the cable and native USB routing before assuming the bootloader is missing.
Install over SWD
- Prepare an nRF52840-compatible SWD debug probe supported by nRF Util, and install Nordic nRF Util with its device programming support.
- Obtain the NX40 bootloader HEX image from
bootloader/nx40_nrf52840/in the KORLINX Arduino core. Use the image for targetnx40_nrf52840, not another nRF52840 board. - With power disconnected, connect the probe to the board's SWD interface according to the probe instructions and the released DEV-NX40 schematic. Match SWDIO, SWCLK, GND, and the target voltage reference. Confirm the power arrangement before powering the board; this guide does not assign unverified connector pin numbers.
- Connect the probe to the host and power the target using the approved arrangement. Connect only the intended programming target for the command below.
Full-chip erase The following command erases the entire chip, including existing application firmware and stored data. Preserve anything needed before programming. Run it only when bootloader installation or recovery is required.
- From the directory containing the HEX image, run the command documented by KORLINX:
nrfutil device program \
  --firmware nx40_nrf52840_bootloader-1.0.0_s140_6.1.1.hex \
  --options chip_erase_mode=ERASE_ALL,reset=RESET_SYSTEM
The filename above is the example in the bootloader README. Use the actual NX40-compatible image you obtained if its version differs.
- Wait for programming to finish successfully. Disconnect power before removing the SWD connections.
- Reconnect native USB, enter the bootloader using Reset or SW2 as described above, and confirm NX40BOOT and its serial port appear.
- Continue to Step 1. Subsequent Arduino uploads use USB and do not require the debug probe.
Step 1: Install Arduino IDE
- Download Arduino IDE from the official Arduino software page.
- Install it using the normal procedure for your operating system.
- Start Arduino IDE.
Step 2: Add the KORLINX board-package URL
- Open Arduino IDE preferences:
- Windows or Linux: File > Preferences
- macOS: Arduino IDE > Settings
- Find Additional Boards Manager URLs.
- Add this URL:
https://raw.githubusercontent.com/KORLINX/KORLINX-nRF52-Arduino/refs/heads/master/package_korlinx_index.json
- If another URL is already present, use the list button to add the KORLINX URL on a separate line.
- Select OK.
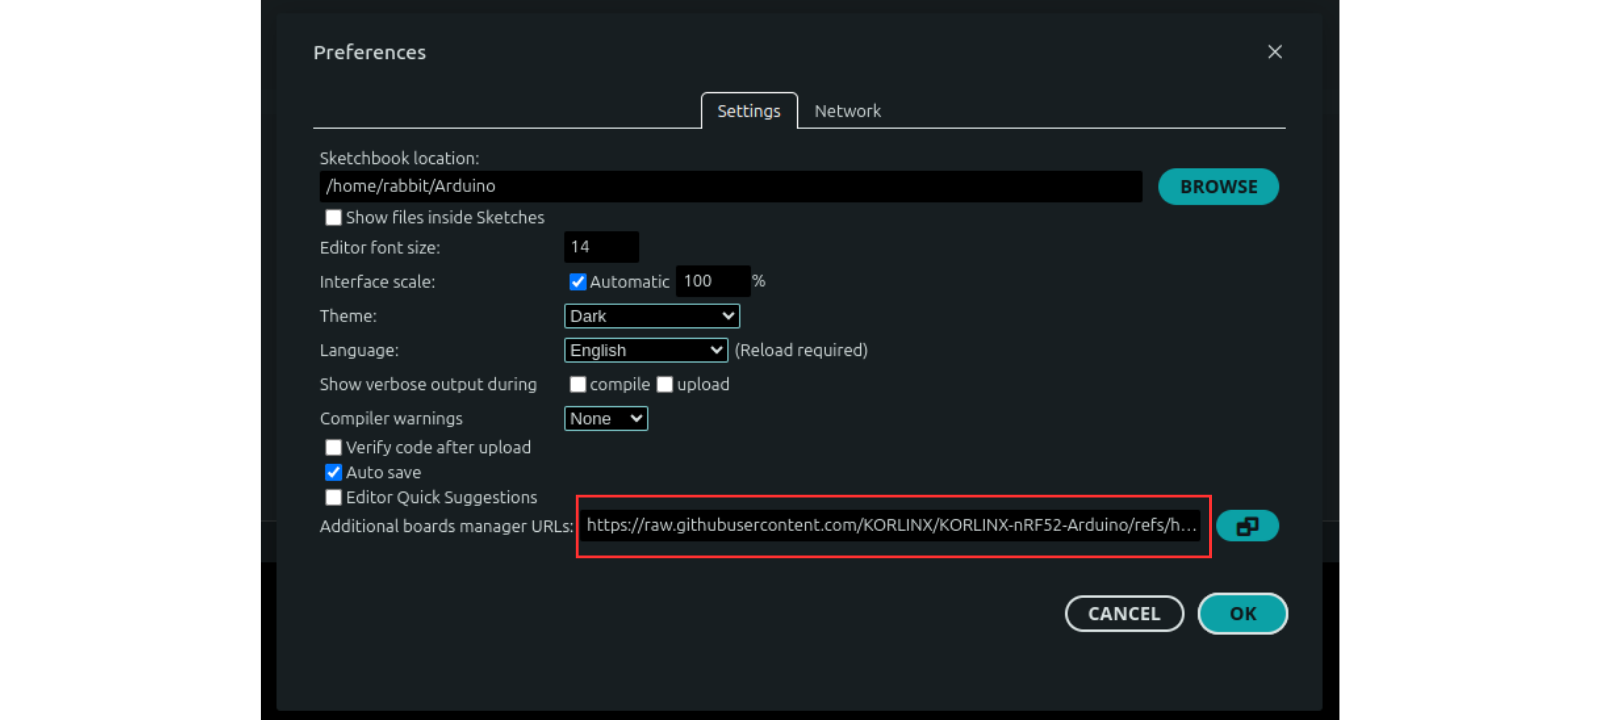
Add the complete KORLINX package-index URL to Arduino IDE.
Step 3: Install KXBoards nRF52
- Open Tools > Board > Boards Manager.
- Search for
KXBoards nRF52orKORLINX. - Select KXBoards nRF52.
- Install the latest version published by KORLINX.
- Wait until Arduino IDE reports that installation is complete.
At the time this page was prepared, the package index published BSP version 1.0.1.
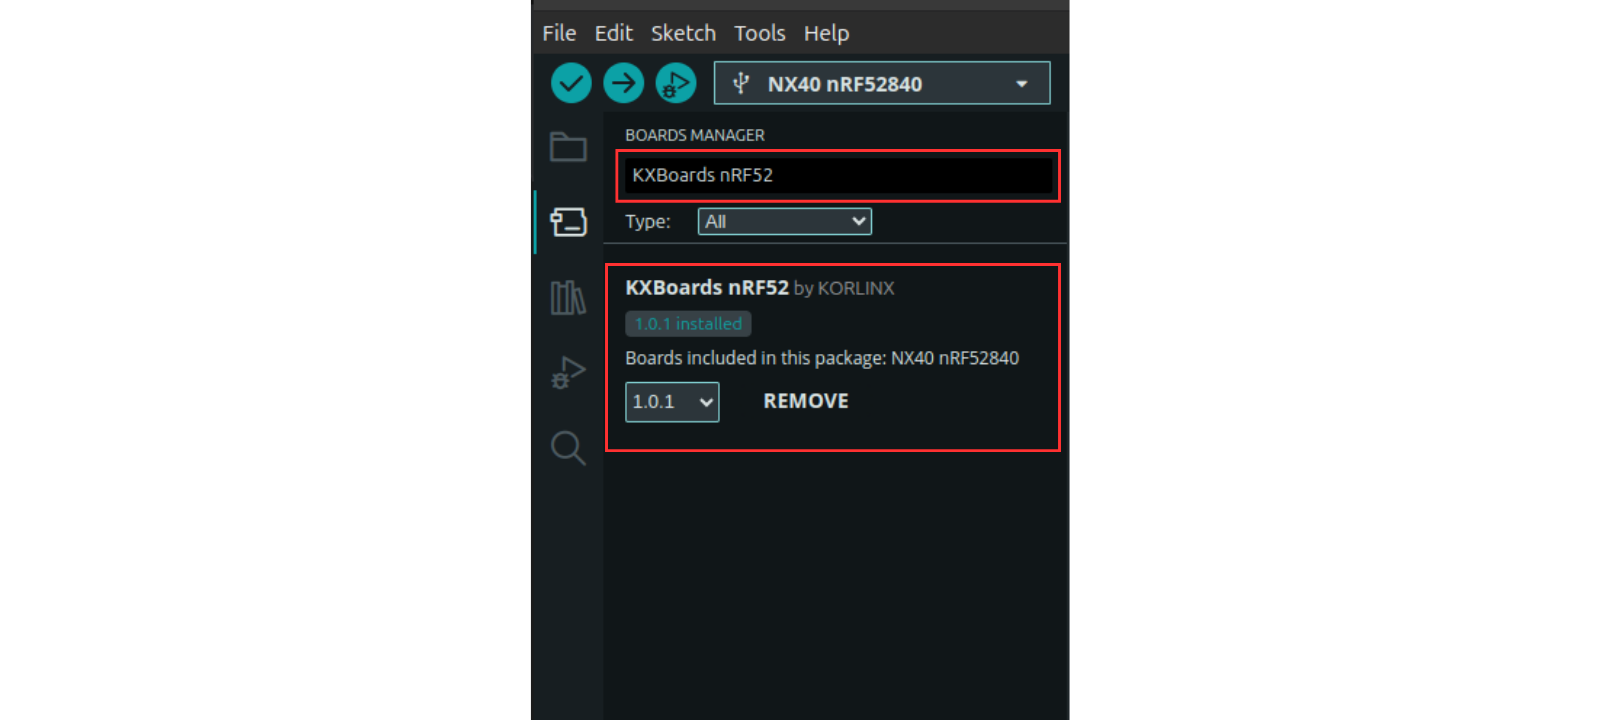
Confirm that KXBoards nRF52 is installed before selecting the NX40 target.
Linux uploader requirement The KORLINX repository instructs Linux users to install the serial DFU uploader separately:
pip3 install --user adafruit-nrfutil
If Python reports an externally managed environment, install the uploader in a virtual environment and make its executable available in the IDE's PATH. Do not override the system Python protection.
After installation, restart Arduino IDE. If upload still reports that adafruit-nrfutil cannot be found, confirm that the Python user binary directory is in PATH.
Step 4: Connect DEV-NX40
- Disconnect unneeded external circuits from the board.
- Connect the native nRF52840 USB interface to the computer with a data-capable USB cable. Confirm connector routing for your hardware revision.
- Confirm that the onboard LED lights up blue when DEV-NX40 is connected by USB cable.
- Wait for the operating system to enumerate the USB device and serial port.
Native USB and FTDI UART are different interfaces The Dev Kit hardware guide also lists an FTDI USB-to-UART bridge. The BSP upload workflow uses native nRF52840 USB, not the FTDI port. If only FTDI appears, confirm the native USB routing and bootloader before proceeding.
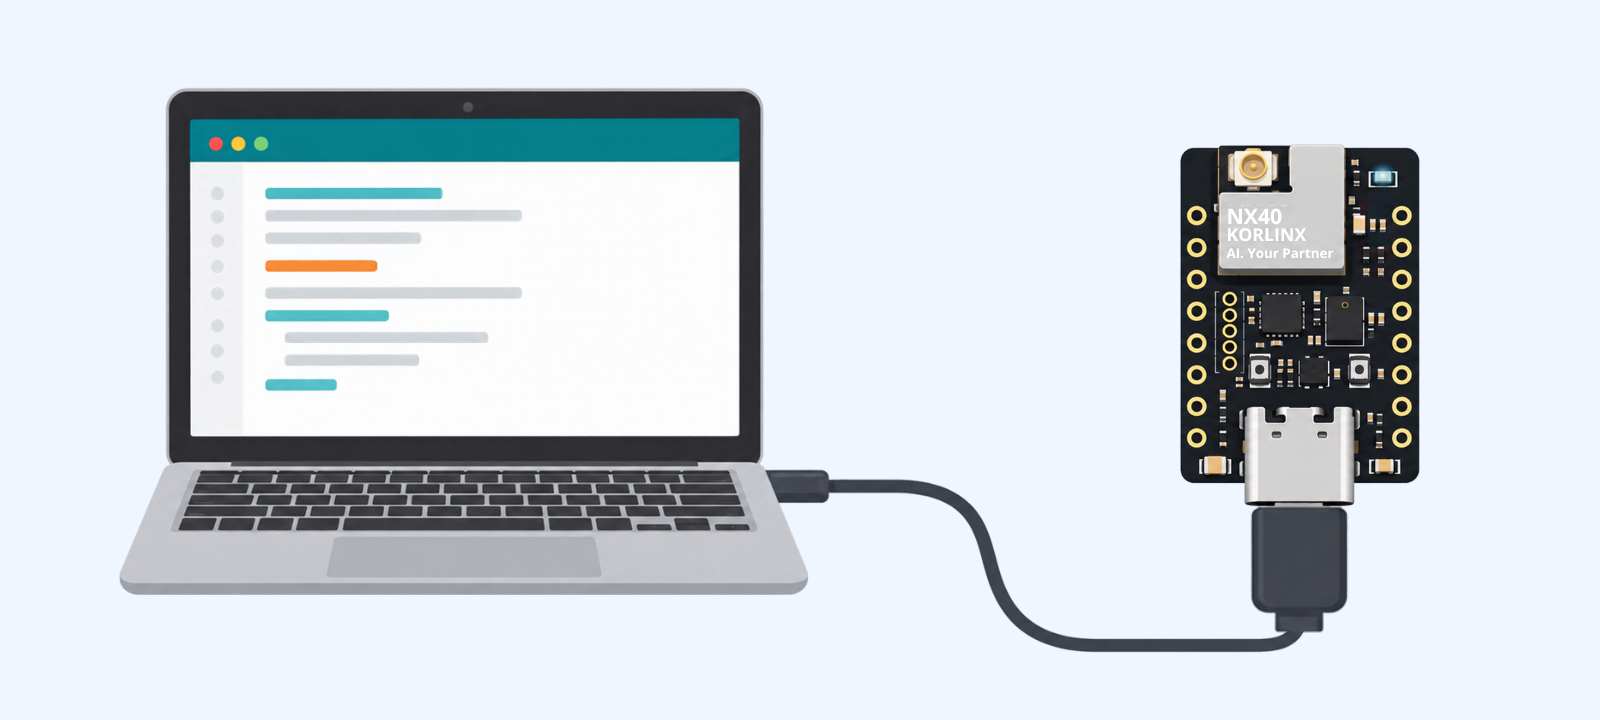
Connect DEV-NX40 with a data-capable USB cable. The connection LED is blue.
Step 5: Select the board and port
- Open Tools > Board.
- Select KXBoards nRF52 > NX40 nRF52840.
- Open Tools > Port and select the native USB port for NX40, rather than an FTDI USB-to-UART port.
- Keep the default board options for the first test:
- SoftDevice:
S140 6.1.1 - Debug Level:
Level 0 (Release) - Debug Port:
Serial
- SoftDevice:
If more than one port is listed, disconnect the board, note which entry disappears, reconnect it, and select that port.
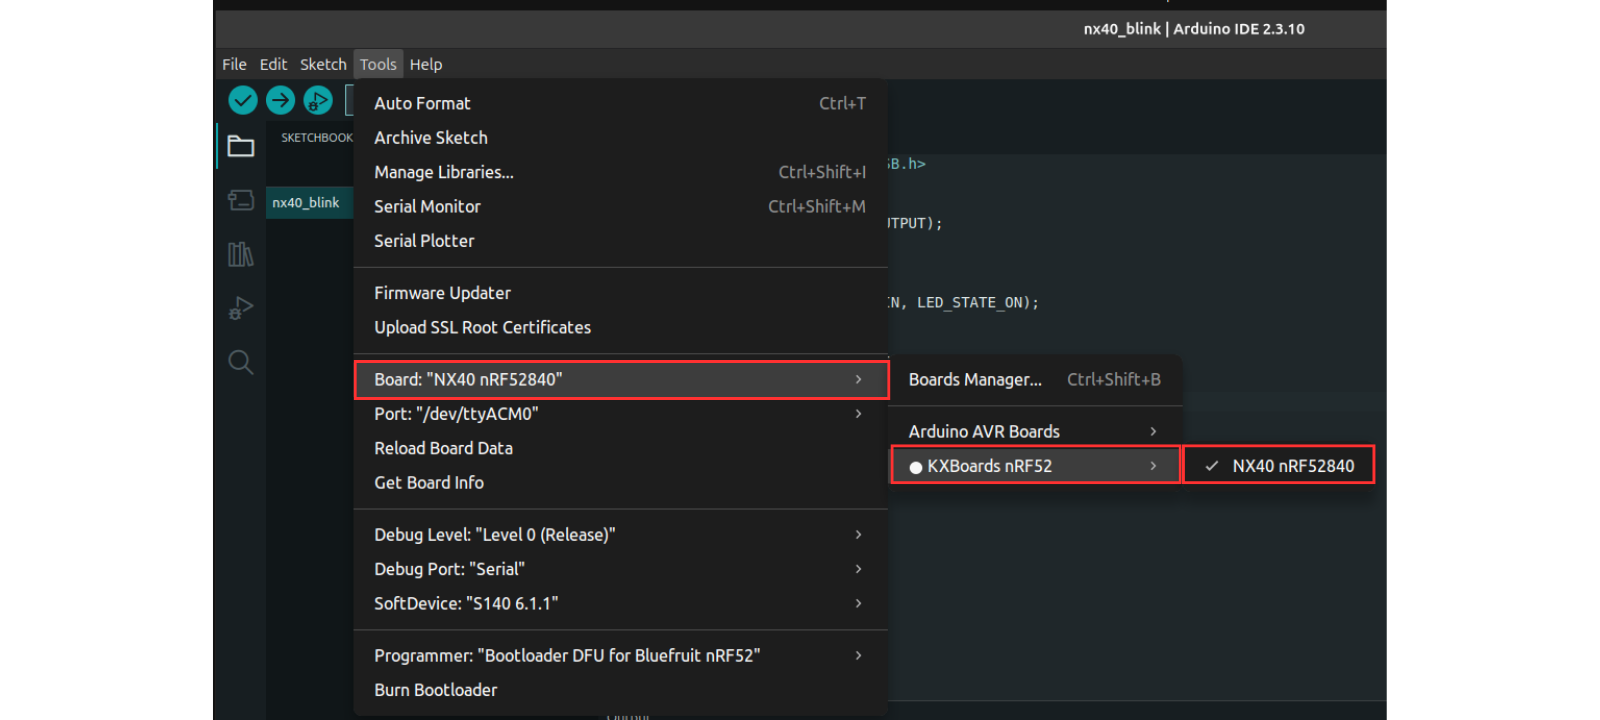
Select NX40 nRF52840, then select the serial port created by the connected board.
Step 6: Create the Blink sketch
Open File > Examples > 01.Basics > Blink.
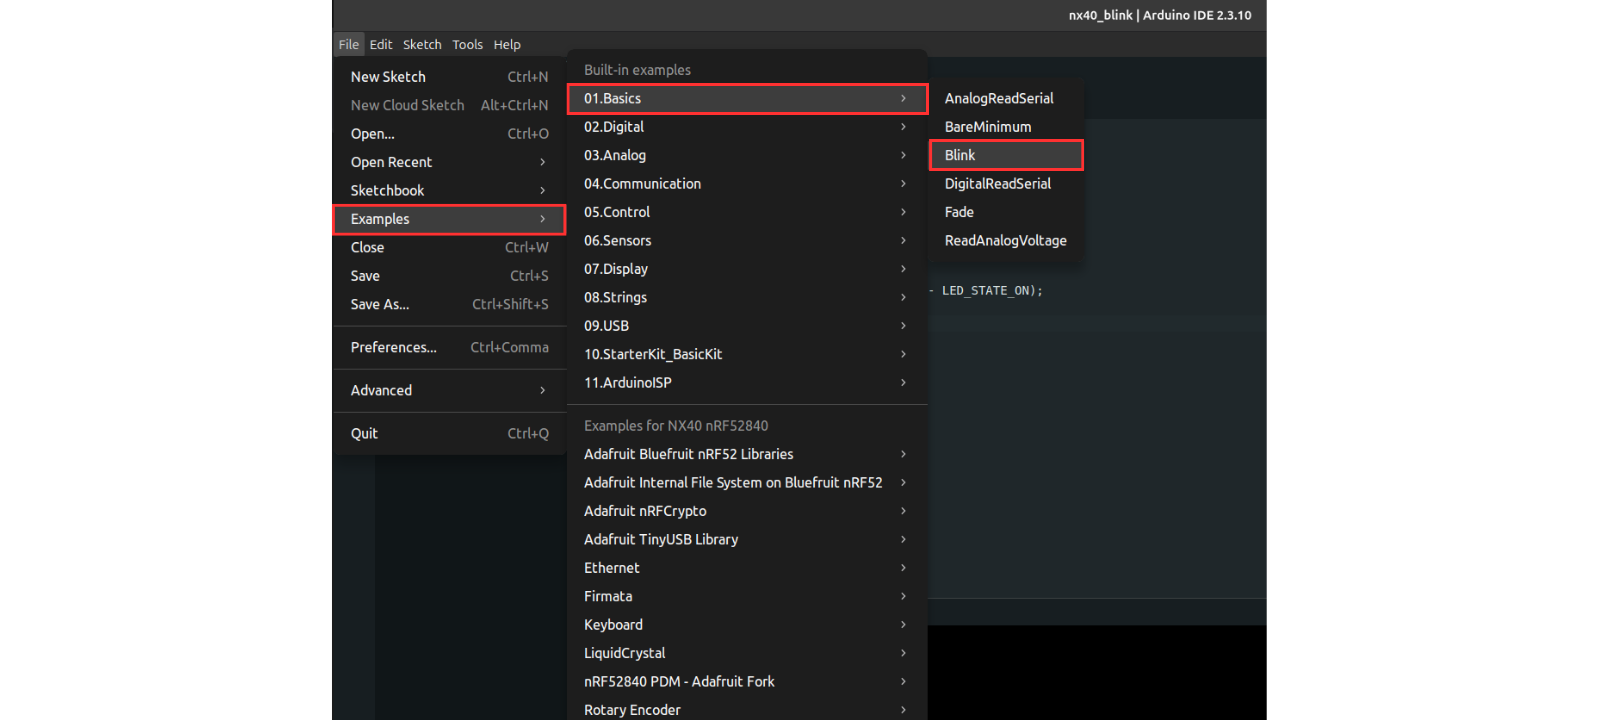
Open the built-in Blink example in Arduino IDE.
Replace the example contents with the following NX40 sketch:
#include <Adafruit_TinyUSB.h>

void setup() {
  pinMode(LED_BUILTIN, OUTPUT);
}

void loop() {
  digitalWrite(LED_BUILTIN, LED_STATE_ON);
  delay(500);

  digitalWrite(LED_BUILTIN, 1 - LED_STATE_ON);
  delay(500);
}
The blue LED observed when connecting the cable indicates the initial connection state. After uploading this Blink sketch, LED_BUILTIN controls the red LED as mapped by the NX40 BSP. The onboard LEDs are active-low, so the sketch uses the BSP-defined LED_STATE_ON value instead of assuming that HIGH means on.
Save the sketch as nx40_blink.
Step 7: Compile and upload
- Select Verify to compile the sketch.
- Confirm that compilation completes without errors.
- Select Upload.
- Wait for Arduino IDE to report a successful upload.
The BSP performs a 1200-bps touch on the selected serial port to enter the DFU bootloader automatically. No button press is required during a normal upload.
During the transition to the bootloader, the operating system may briefly remove and recreate the serial port. This is expected.
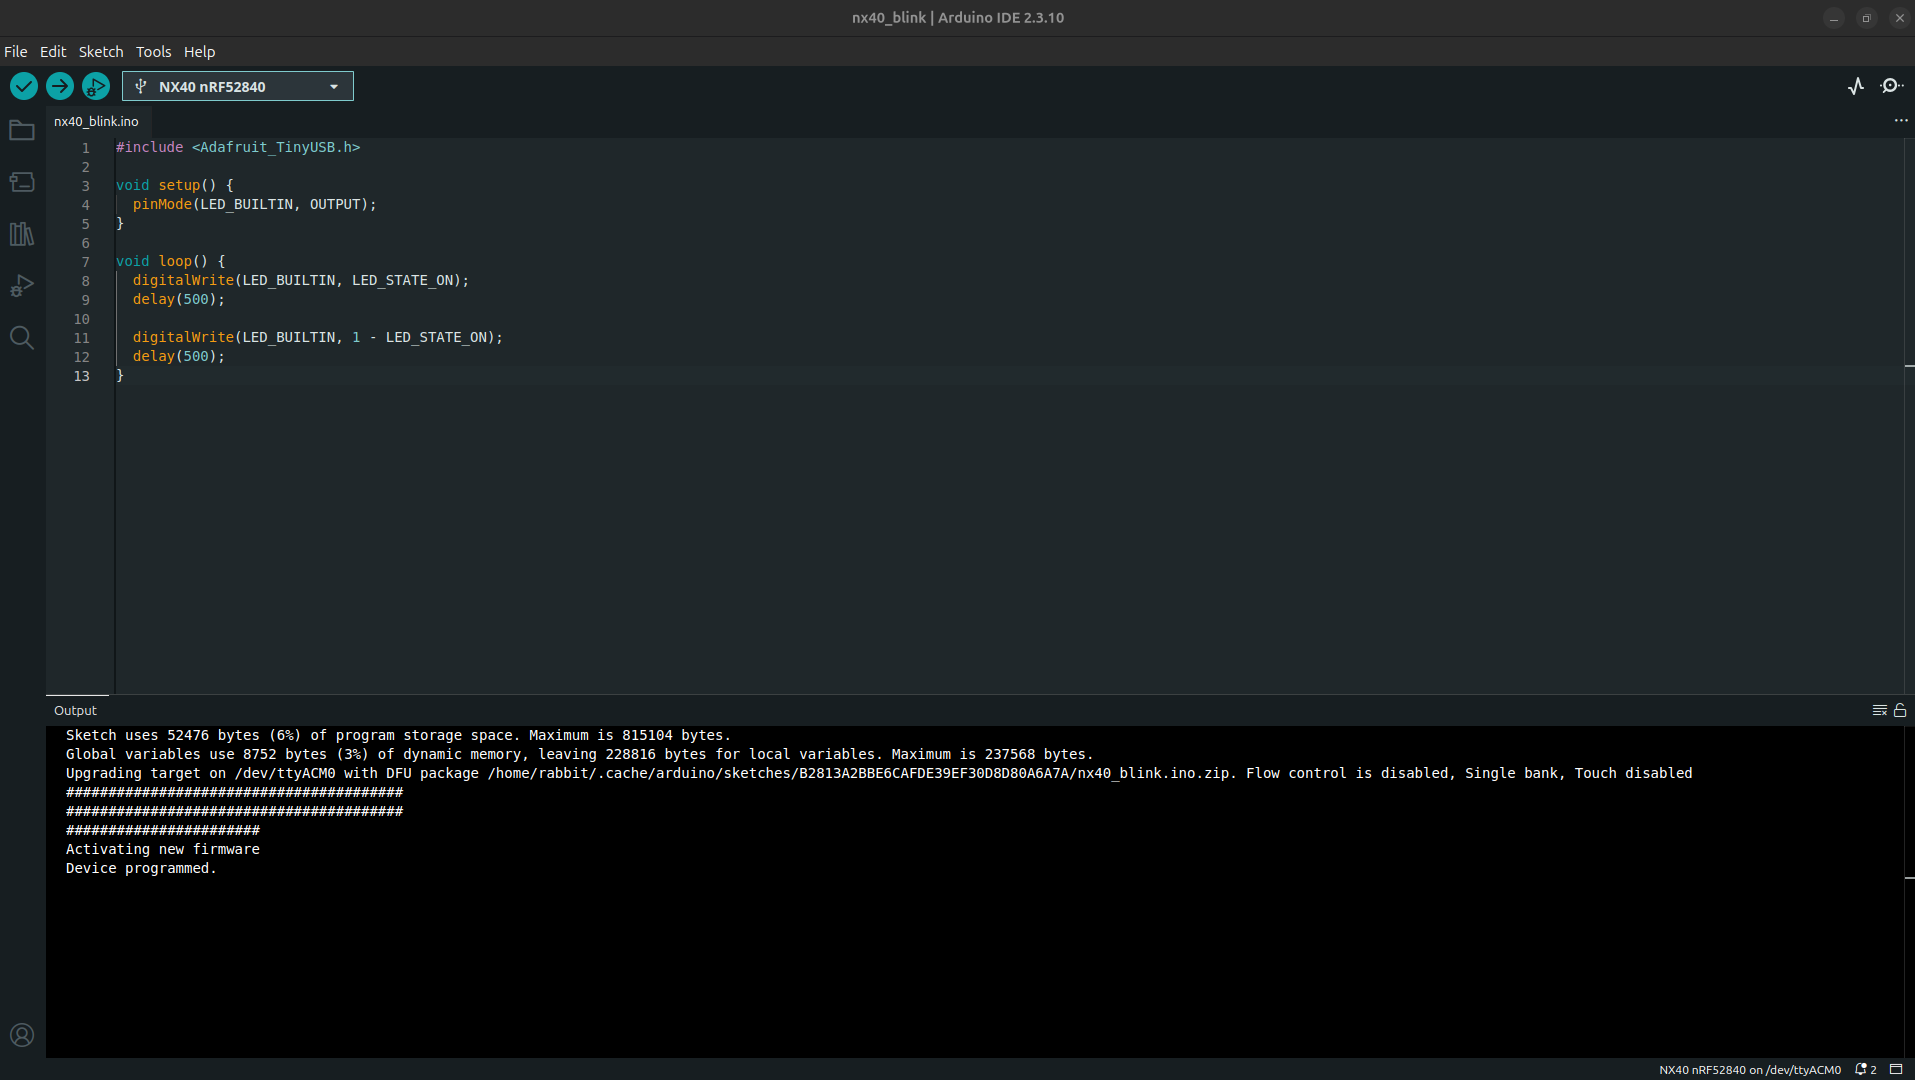
A successful upload starts the Blink sketch on DEV-NX40.
Step 8: Confirm the result
After upload and reset:
- The onboard red user LED turns on for approximately 500 ms.
- The LED turns off for approximately 500 ms.
- The cycle repeats continuously.
If this behavior is visible, the Arduino IDE, KORLINX BSP, bootloader, USB upload path, and NX40 application are working together.
Optional: Verify USB Serial
Upload the following sketch:
#include <Adafruit_TinyUSB.h>

void setup() {
  Serial.begin(115200);
  const uint32_t started = millis();
  while (!Serial && millis() - started < 3000) {
    delay(10);
  }
}

void loop() {
  if (Serial) {
    Serial.println("KORLINX NX40 Arduino is running");
  }
  delay(1000);
}
Then:
- Reselect the application USB port after upload if it changed, then open Tools > Serial Monitor.
- Select
115200baud. - Confirm that this line appears once per second:
KORLINX NX40 Arduino is running
Serial uses native USB CDC; Serial1 uses the UART pins. The USB message will not appear on an FTDI UART port.
The Adafruit_TinyUSB.h include is intentional. The KORLINX BSP README recommends it if a sketch that uses Serial otherwise fails with an undefined-reference error.
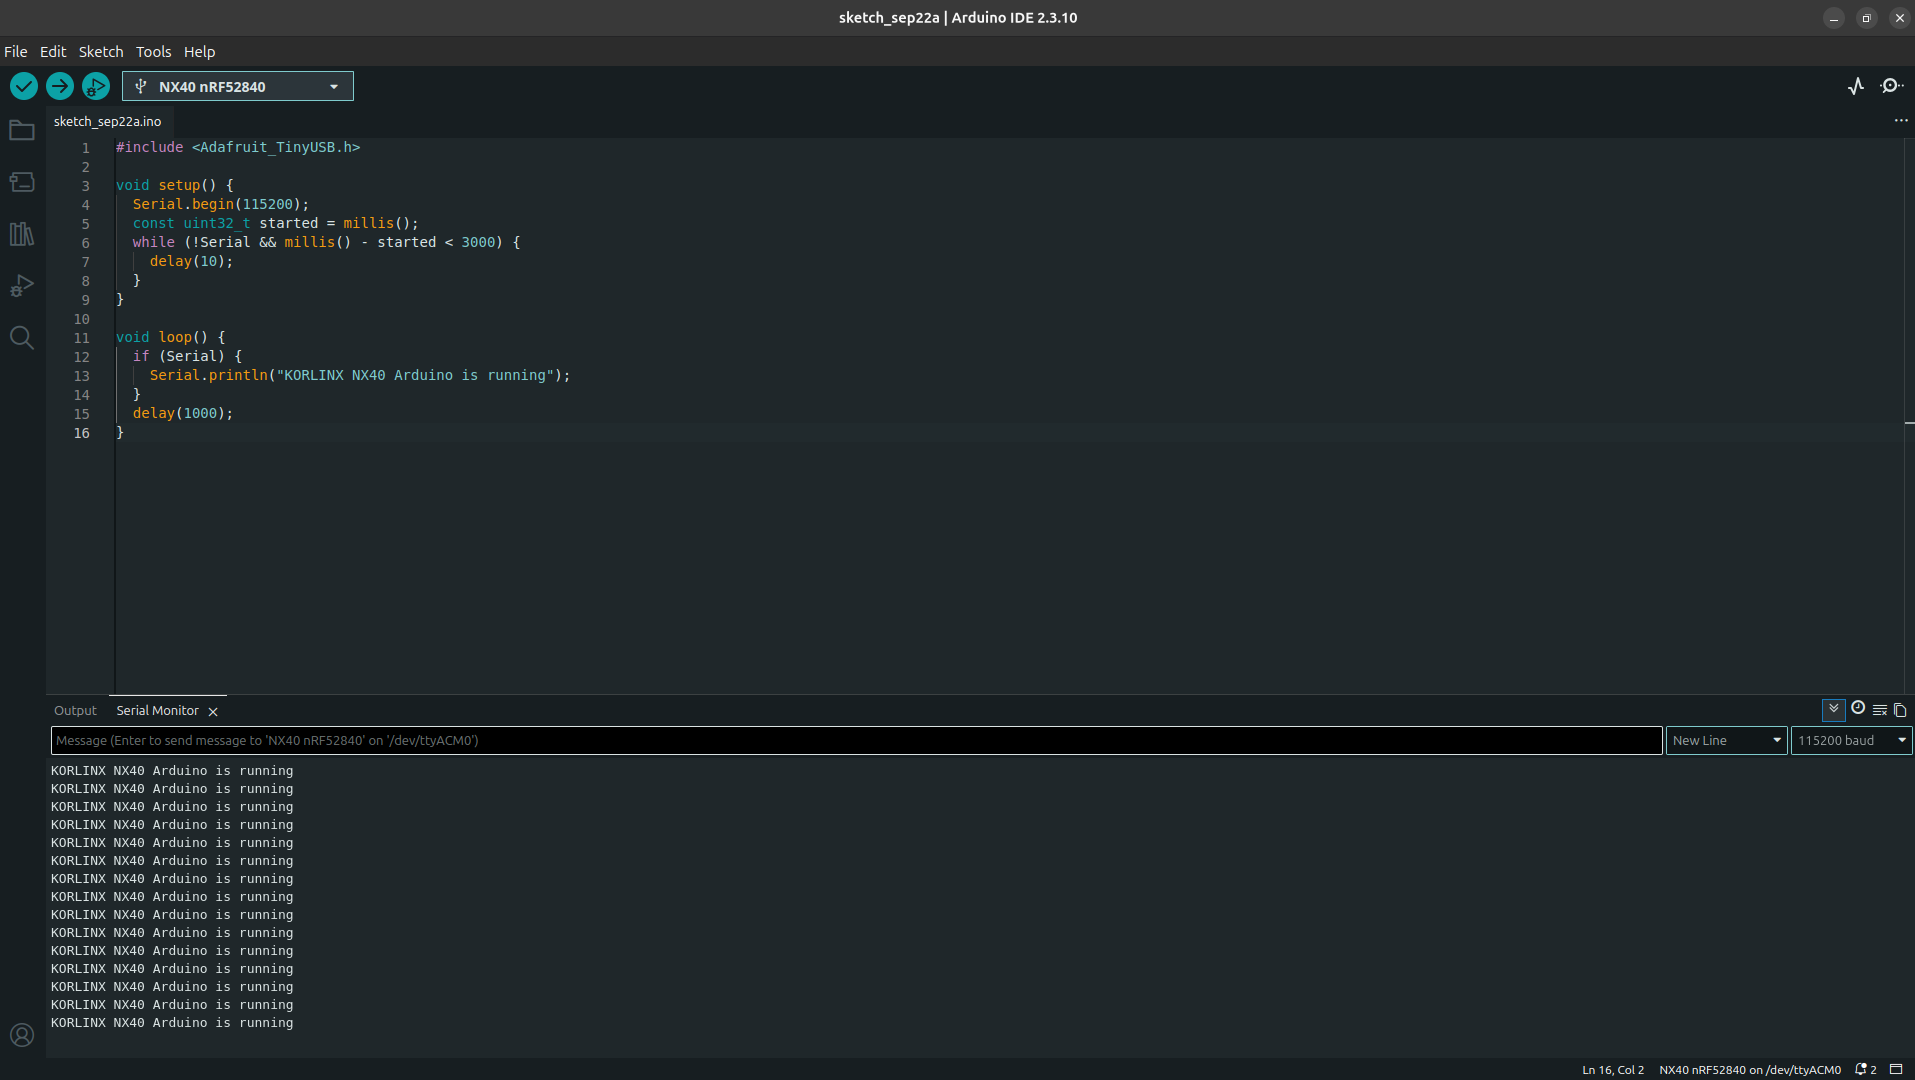
The test message should appear approximately once per second.
BSP pin aliases used by Arduino
Use symbolic names in sketches wherever possible. They make code clearer and reduce dependence on raw GPIO numbers.
| Arduino symbol or object | BSP function | BSP mapping |
|---|---|---|
LED_BUILTIN, LED_RED | Red user LED | Arduino pin 11 / P0.11, active-low |
LED_BLUE | Blue user LED | Arduino pin 8 / P0.08, active-low |
LED_GREEN | Green user LED | Arduino pin 19 / P0.19, active-low |
LED_RUN | Run LED | Arduino pin 14 / P0.14, active-low |
PIN_BUTTON1 | User button | Arduino pin 7 / P0.07, active-low |
Serial | Native USB CDC | USB virtual serial port |
Serial1 | Hardware UART | TX P0.20, RX P0.21 |
Wire | I2C | SDA P0.06, SCL P0.23 |
SPI | SPI | MISO P0.28, MOSI P0.29, SCK P0.30, SS P0.05 |
A0 to A6 | External analog aliases | P0.02, P0.03, P0.04, P0.05, P0.28, P0.29, P0.30 |
A7 / PIN_VBAT | Battery-divider input | P0.31; not a general external analog input |
Check the hardware guide before wiring This table reports the BSP's software mapping. Use the released DEV-NX40 pinout and schematic to identify physical connector positions, supply rails, reserved signals, and safe electrical limits.
Troubleshooting
| Symptom | What to check |
|---|---|
| KXBoards nRF52 does not appear | Confirm the package URL has no spaces or missing characters, reopen Boards Manager, and restart Arduino IDE |
| NX40 nRF52840 does not appear | Confirm that KXBoards nRF52 installed successfully; remove any incomplete installation and reinstall it |
| No serial port appears | Use a data-capable cable, try a direct USB port, close other serial applications, and check operating-system device permissions |
| Upload starts but cannot find the new port | Wait for USB re-enumeration, reselect the port, and retry; confirm the KORLINX bootloader is present |
adafruit-nrfutil: command not found on Linux | Run pip3 install --user adafruit-nrfutil, place the Python user binary directory in PATH, and restart Arduino IDE |
fatal error: Adafruit_USBD_CDC.h: No such file or directory | If installed from source, run git submodule update --init --recursive; the Board Manager package should already include required files |
undefined reference to 'Serial' | Add #include <Adafruit_TinyUSB.h> to the sketch |
| Upload repeatedly fails on a blank or previously reprogrammed board | The UF2/DFU bootloader may be absent; recover it over SWD using the KORLINX bootloader procedure |
| Upload succeeds but the LED does not blink | Use the sketch above, check the active-low logic, confirm the selected board, and verify the LED assignment for the hardware revision |
| Serial Monitor is blank | Reopen the port after upload, select 115200 baud, reset the board, and confirm the TinyUSB include is present |
Bootloader recovery changes device flash Bootloader installation or recovery over SWD can erase existing firmware. Follow Step 0 and confirm the target device before programming.

The serial port may briefly disappear or change while the board enters DFU mode.
Optional: Use Arduino CLI
After installing Arduino CLI, add the KORLINX package index and install the core:
arduino-cli core update-index \
  --additional-urls https://raw.githubusercontent.com/KORLINX/KORLINX-nRF52-Arduino/refs/heads/master/package_korlinx_index.json

arduino-cli core install korlinx:nrf52 \
  --additional-urls https://raw.githubusercontent.com/KORLINX/KORLINX-nRF52-Arduino/refs/heads/master/package_korlinx_index.json
List connected boards:
arduino-cli board list
Compile and upload the sketch:
arduino-cli compile \
  --fqbn korlinx:nrf52:nx40 \
  --output-dir ./nx40_blink/build \
  nx40_blink

arduino-cli upload \
  --port "YOUR_PORT" \
  --fqbn korlinx:nrf52:nx40 \
  --input-dir ./nx40_blink/build \
  nx40_blink
Replace YOUR_PORT with the native USB port reported by arduino-cli board list. The explicit build directory passes the compiled files to the separate upload command.

Illustrated command guide for korlinx:nrf52:nx40. Replace YOUR_PORT with your native USB port; this image is not a captured test session.
Optional: Install the BSP from source
Boards Manager is the recommended installation method. The example below assumes the sketchbook is ~/Documents/Arduino; substitute the Sketchbook location shown in IDE Preferences if different. BSP contributors can instead clone the source repository into the Arduino hardware directory:
mkdir -p ~/Documents/Arduino/hardware/korlinx
git clone --recursive \
  https://github.com/KORLINX/KORLINX-nRF52-Arduino.git \
  ~/Documents/Arduino/hardware/korlinx/nrf52
Restart Arduino IDE after cloning. If the repository was cloned without --recursive, initialize its required submodules:
cd ~/Documents/Arduino/hardware/korlinx/nrf52
git submodule update --init --recursive