
AS-613 Licensed Application Modes
AS-613 provides application-specific modes for restroom monitoring, hospital-bed monitoring, and room presence tracking. The manual identifies Modes 11, 13, and 14 as option modes and notes that production availability depends on the license.
Independent safety controls required Do not use AS-613 as the sole fall alarm, patient monitor, emergency-call system, pressure-ulcer prevention control, or life-safety detector. The supplied manual provides no medical-device approval, clinical validation, availability target, fault-detection mechanism, or safety integrity level.
Confirm the license first
The manual says evaluation samples include option modes, while mass-production availability depends on the license. Before configuration, record:
- Exact SKU and hardware revision
- Firmware returned by
ver - Enabled mode list
- License/provisioning method
- Behavior and response when an unavailable mode is requested
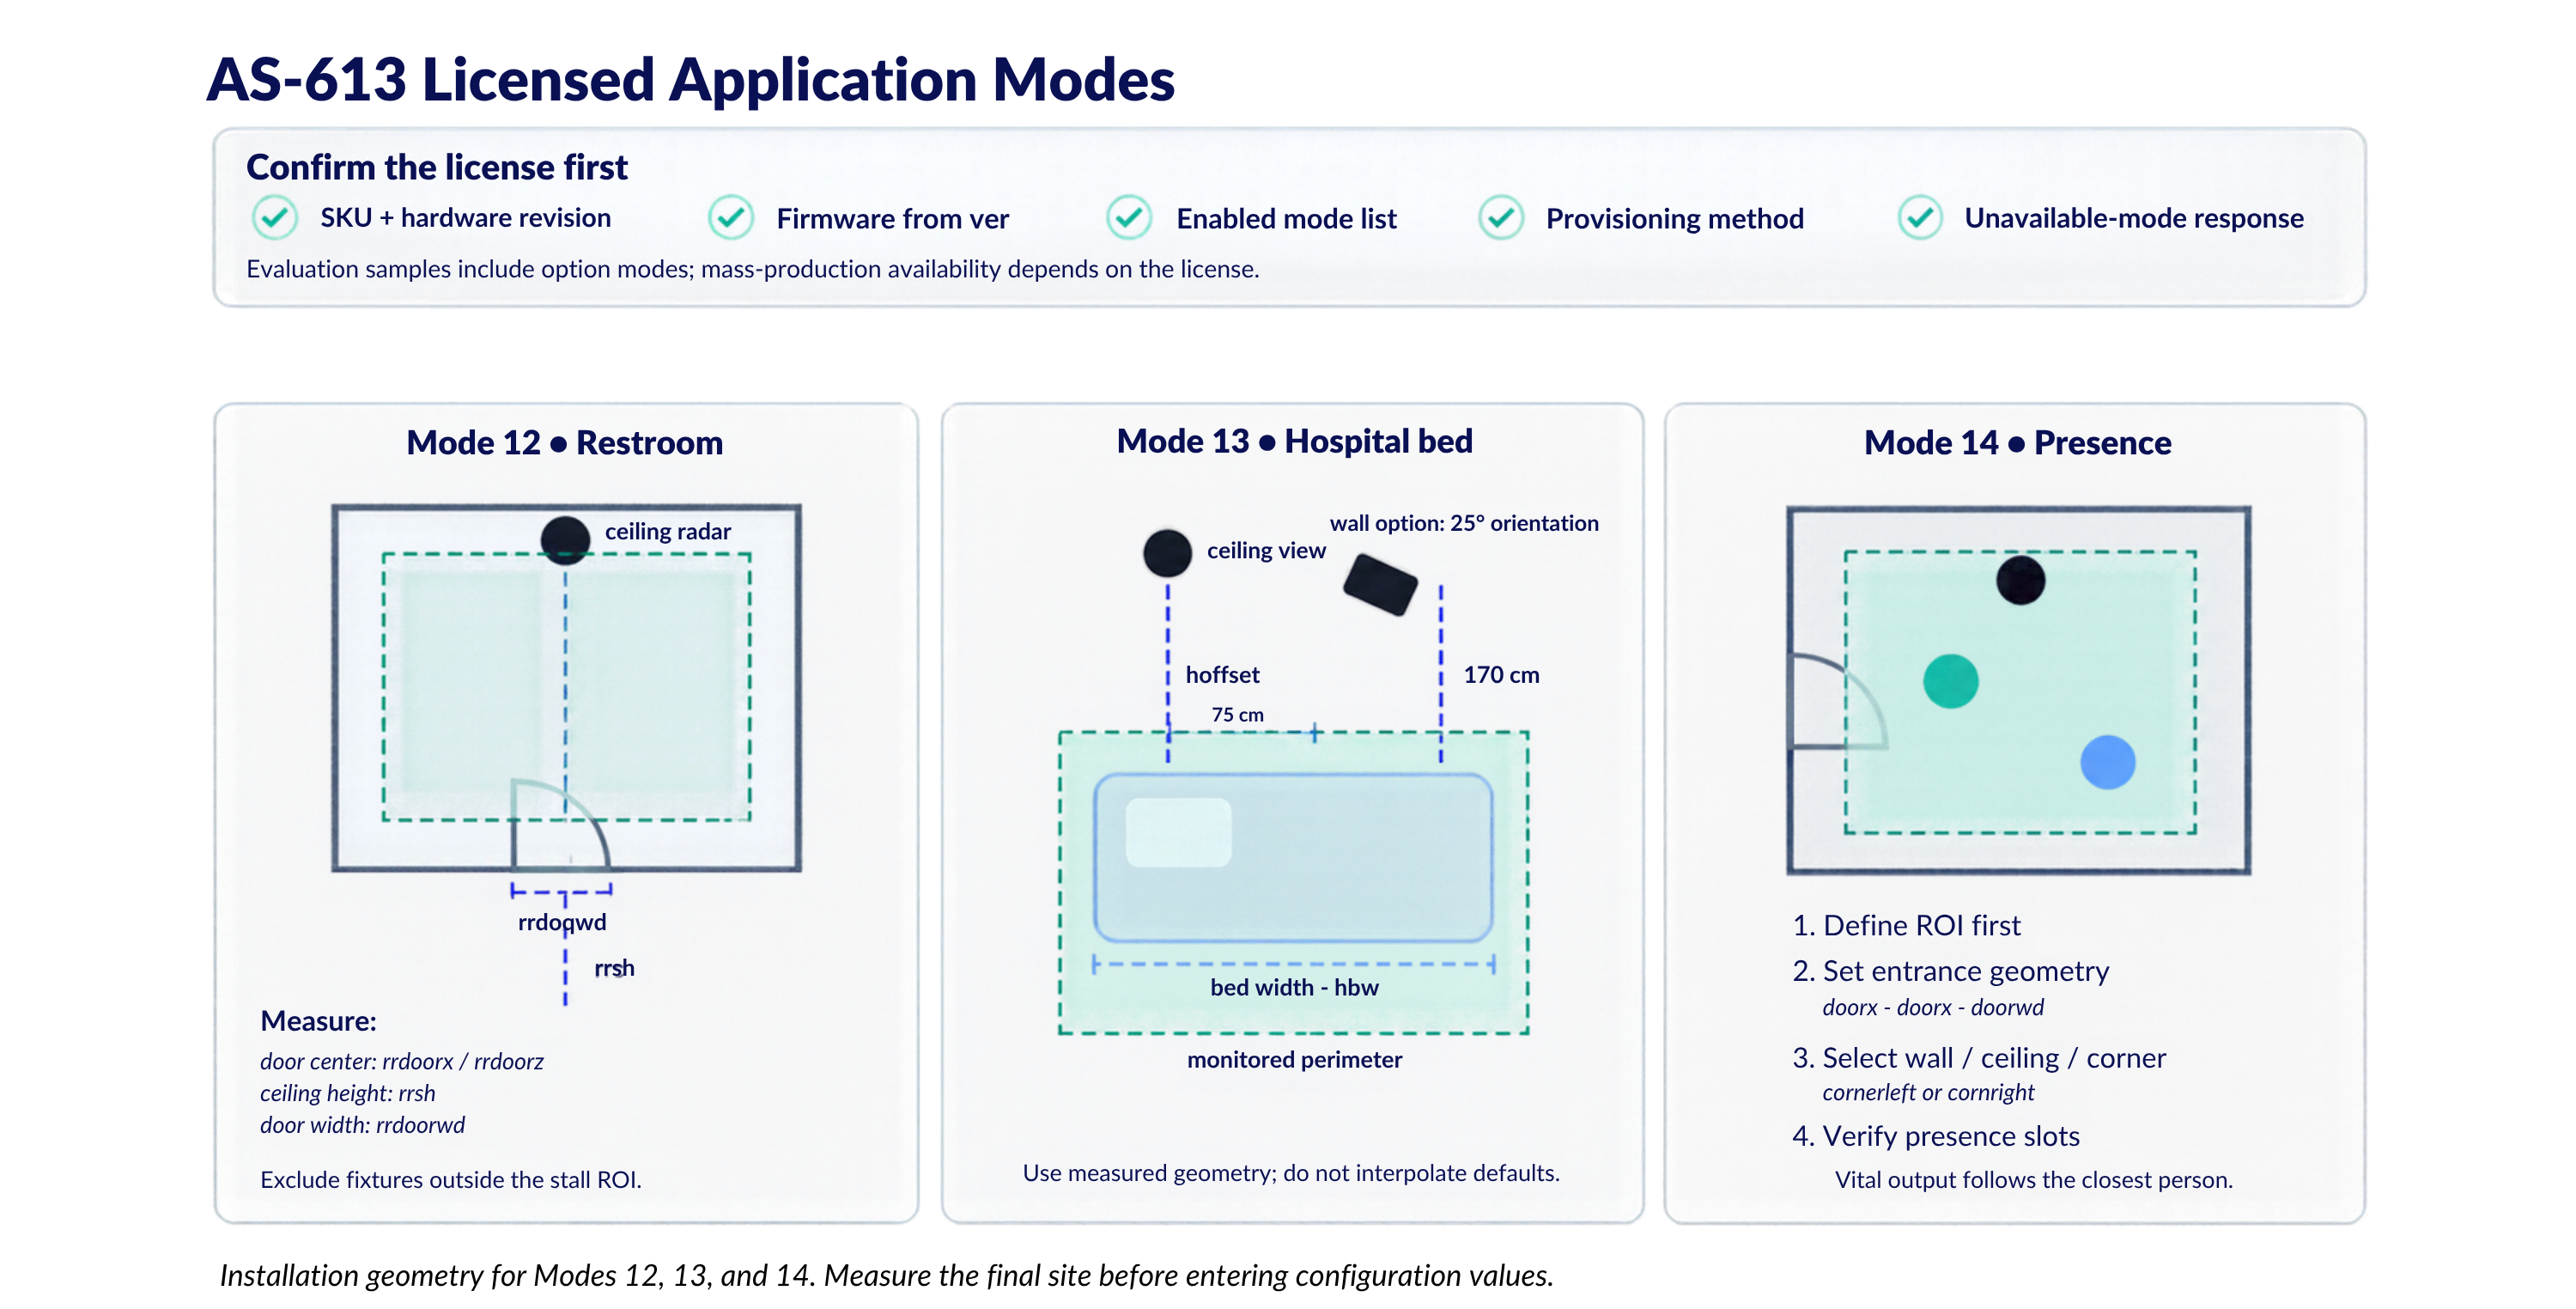
Installation geometry for Modes 12, 13, and 14. Measure the final site before entering configuration values.
Mode 12: Restroom ceiling mode
Mode 12 is described as a ceiling-installed mode that reports occupancy and breathing information and distinguishes standing, sitting, and lying states.
The supplied manual does not include a dedicated Mode 12 description/data-format section. It documents the mode only in summaries, commands, and the initial-setup procedure. The packet start character is ^, but the field layout and state definitions are missing.
Documented setup sequence
- Install the sensor rigidly on the ceiling.
- Enter Mode 12.
- Set the measured installation height with
rrsh(documented range 100-300 cm; default 220 cm). - Configure the narrow ROI and angles for the stall.
- Set the stay-time reference with
rstc(1-30 minutes; default 5). - Measure and set the entrance center with
rrdoorxandrrdoorz. - Set the entrance detection diameter with
rrdoorwd(60–120 cm). The command table shows 80 cm as the default; the setup example uses 100 cm. - Set breathing limits and waveform behavior only where the manual provides a complete command definition for the active firmware and mode.
- Validate the real exit path and vacancy transition.
The manual says that when a target is lost near a correctly configured door for about 0.8 seconds, the state can switch to vacant. Other losses can retain the last state for up to 10 minutes. Incorrect entrance settings can therefore delay vacancy decisions.
The manual does not provide the complete Mode 12 ^ packet grammar or state field definitions. Use Mode 12 only with the corresponding protocol information supplied for the installed firmware.
Mode 13: Hospital-bed mode
Mode 13 combines bed-presence state, posture-related state, closest-person vital signs, fall-risk/event states, and pressure-ulcer-risk states. It supports ceiling and wall installation.
Ceiling installation
The manual describes:
- Sensor aligned with the bed center in the left-right direction.
- Approximately 75 cm from the wall when the head of the bed faces the wall.
hbshsets ceiling sensor height (100-300 cm; default 220 cm).hbhsets mattress-top height (10-69 cm; default 55 cm).hbwsets bed width. Use the 90–160 cm range in the Mode 13 installation description; the command table shows a wider range.wallsidedefines the bed-to-wall direction.hoffsetcompensates a bed shift within about 20 cm.
Wall installation
For hbinstall 1, the source specifies fixed software assumptions:
- Sensor height: 170 cm
- Sensor orientation: 25° relative to the floor, described by the manual as a 65° downward pitch from horizontal
- Bed head toward the sensor/wall
wallsidechanges rejected as unsupported
Do not interpolate these values to another installation geometry.
Fall-related boundary
The source defines a narrow fall sequence:
- Patient is lying/sitting in the bed center.
- Patient moves to and sits at the bed edge, creating a fall-risk state.
- Patient is then detected sitting or lying on the floor beside the bed, creating a fall-event state.
The manual explicitly says falls are not detected in other situations. Therefore, do not market Mode 13 as general room-wide fall detection.
Hospital-bed states
| State | Manual meaning |
|---|---|
| 0 | Bed empty |
| 1 | Patient standing beside/outside bed |
| 2 | Patient sitting or lying beside/outside bed |
| 3 | Patient on bed, awake |
| 4 | Patient on bed, tossing/turning |
| 5 | Patient on bed, sleeping |
| 6 | Bed fall-risk warning |
| 7 | Bed fall occurrence detected |
| 8 | Pressure-ulcer-risk warning |
| 9 | High pressure-ulcer-risk warning |
These are firmware output labels, not clinically validated diagnoses.
Mode 13 packets
No waveform:
/A!
/ABBBCCDDEEFFGGHIIJJJ!
Waveform enabled:
\A!
\ABBBCCDDEEFFGGHIIJJJKKK!
The longer packets include state, heart rate, breathing rate, optional external SpO2/temperature fields, RMSSD, SDNN, external-device type/status, temporary data, and - when enabled - respiration waveform.
The manual says heart rate from a patient lying in varied postures should be used only as reference; in the current version only the breathing waveform is provided.
For installation, use the Mode 13 bed-width range of 90–160 cm and the hoffset command named in the setup text. The command table contains a wider hbw range, and one diagram labels the offset as hboffset.
Mode 14: Presence detection
Mode 14 maintains up to five presence slots and supports wall, ceiling, or corner installation. It keeps a presence state through short pauses or temporary non-detection and uses a measured entrance area to decide whether a target has left.
Two work profiles are documented:
pwork 0-DISTANCE_WORK: position, accumulated presence time, and accumulated non-detection time.pwork 1-VITAL_WORK: the same presence information plus vital data for the single closest person; other slots contain zero vital fields.
Required setup order
- Enter Mode 14.
- Select
pmount 0wall,pmount 1ceiling, orpmount 2corner. - Select
pwork 0orpwork 1. - Fix the detection geometry first.
- Measure and set the entrance position.
- Set the entrance diameter with
doorwd(80-150 cm), including any desired margin. - Add exclusion zones only after the geometry and entrance are final.
- Query
infoand validate the actual<or>packets. - Use
presenceclronly to initialize live presence slots and the vacancy counter during a controlled setup.
Corner installation
For corner mounting, set measured left- and right-wall lengths using cornerleft and cornerright. The firmware recalculates the coordinate limits. Entrance input differs from wall/ceiling mounting:
- Negative
doorx: entrance on the left wall. - Positive
doorz: entrance on the right wall.
Mode 14 packets
Distance work:
<ZZZ!
<ABBBBCCCDEEEFFFGGG!
<ABBBBCCCDEEEFFFGGGHHHH!
Vital work:
>ZZZ!
>ABBBBCCCDEEEFFFGGGHHHIIJJJ!
>ABBBBCCCDEEEFFFGGGHHHIIJJJKKKK!
Presence and non-detection times are three-digit hexadecimal minute fields. Extended output adds signed Y. Only the closest person's heart rate, breathing rate, and waveform fields are meaningful in VITAL_WORK.
Mode 14 setup
The Mode 14 description and initial-setup sections show different wall and ceiling default geometries. Query the active configuration with info and set the measured installation geometry. The command table marks wave unsupported in Mode 14, so do not enable it in this guide.
Validation checklist
- Verify license and firmware before installation.
- Confirm coordinate frame and measured geometry.
- Validate entry, exit, temporary occlusion, stationary person, multiple people, moving devices, pets, and power-cycle behavior.
- Verify every alarm/state transition against synchronized video or another suitable reference method.
- Test network/host failure, malformed packets, sensor restart, configuration loss, and stale-state handling.
- Add independent emergency and safety controls appropriate to the final product.
- Retain raw logs, setup photos, test conditions, sample count, acceptance criteria, reviewer, and date.